
Handling pending cancellations manually is a nightmare.
You’ve got notices coming in from different carriers, each with its own format. Some include a reason for cancellation, some don’t. Some provide the amount due, others leave you guessing. It’s a mess.
And if you don’t stay on top of it? Policies slip through the cracks. Clients get frustrated. Your retention rate takes a hit.
But here’s the thing—this entire process can be automated.
By using Adapt API, Zapier, and webhooks, you can set up a system that pulls billing notices, sorts the data, and either creates a service request or alerts your team if something needs attention. No more scrambling to figure out who’s about to lose coverage. No more wasted hours manually tracking down missing details.
This isn’t about replacing your team. It’s about freeing them from tedious admin work so they can focus on what actually moves the needle—building relationships and keeping clients happy.
Let’s break down exactly how to set this up.
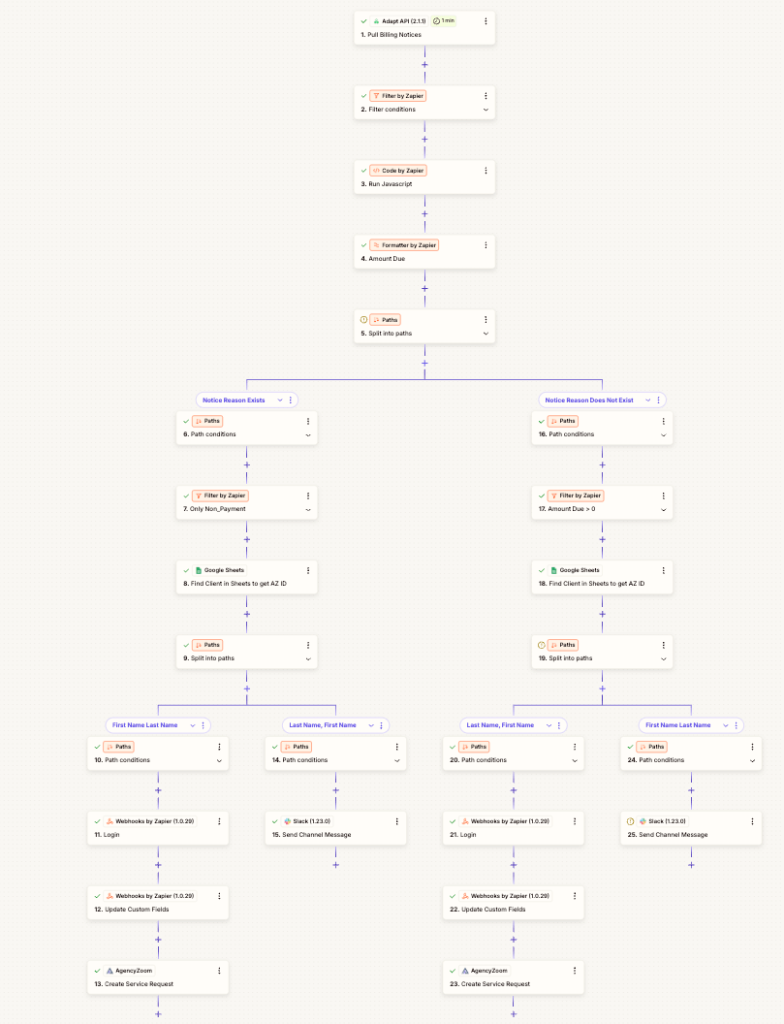
Step 1: Setting Up the Adapt API Trigger
The key to automating pending cancellations is getting the right data at the right time. If your system isn’t pulling billing notices accurately, everything else falls apart.
That’s where Adapt API comes in.
It pulls billing notices directly from your carriers and feeds them into your automation workflow. But not every notice matters. You don’t need updates on every invoice or payment received. You only care about pending cancellations.
Here’s how to filter out the noise and focus on what actually needs action.
1. Connect to the Adapt API
Since this is a private Zap, you’ll need access. Reach out to your provider or developer to get added. Once connected, set your trigger to pull billing notices.
2. Filter for Pending Cancellations
Not every billing notice requires a response. You’re only interested in policies at risk of cancellation. To avoid cluttering your system with irrelevant data, filter for:
- Notice Type: Must be “Pending Cancellation”
- Notice Reason: Look for non-pay status or similar wording
Some carriers send a reason, others don’t. That’s a problem. If your automation only works when the notice reason is provided, you’re going to miss cancellations from carriers that leave this field blank.
3. Account for Missing Data
If a carrier doesn’t provide a notice reason, the system needs to flag it. The last thing you want is a cancellation slipping through because the data wasn’t complete.
Use Zapier paths to handle these situations:
- If the notice reason exists, process the cancellation as usual.
- If the notice reason is missing, send an alert to your team to check the carrier’s website.
This alone will save hours of manual tracking and prevent missed cancellations.
With the right trigger in place, you’re ready to move to the next step—sorting and processing the data.
Step 2: Using Zapier Paths to Handle Variations
Carriers are wildly inconsistent with how they send billing notices. Some include a cancellation reason, others don’t. Some format names as “First Last,” while others go with “Last, First.” If you don’t account for these differences, your automation will break the moment it runs into an unexpected format.
That’s why Zapier paths are a game changer. They let you create conditional workflows that adapt based on the data received.
1. Splitting Based on Notice Reason
If every carrier followed the same rules, this would be easy. But they don’t. Some will clearly state the reason for cancellation, while others leave it blank.
Set up Zapier paths to handle both cases:
- Path 1: If the notice reason exists, move forward with automation.
- Path 2: If the notice reason is missing, trigger an internal alert.
This ensures that no pending cancellation gets ignored just because a carrier didn’t provide the full details.
2. Handling Different Name Formats
Another common problem is how carriers format client names. Some send “John Smith,” while others send “Smith, John.” If your automation isn’t prepared for both, you’ll end up with mismatched data.
Zapier can detect whether a comma is present and separate first and last names accordingly. This keeps your records clean and ensures that every request is matched to the right client.
3. Accounting for Missing Payment Information
Believe it or not, some carriers don’t even include the amount due on their billing notices. If a pending cancellation comes in without a balance, your system needs to flag it.
Set up another Zapier path to handle this:
- If an amount due is present, continue processing.
- If no amount is listed, trigger an internal notification to investigate.
This keeps your team in the loop while preventing gaps in your workflow.
By structuring your automation to handle these variations, you eliminate the guesswork and ensure that every cancellation notice is processed correctly. Now it’s time to match this data to the right client.
Step 3: Matching Client Data for Accuracy
Your automation is only as good as the data feeding into it. If a pending cancellation comes through but doesn’t match a client in your system, what happens? Does it just disappear? Does someone have to stop what they’re doing to hunt it down manually?
Neither of those is an option.
To keep everything running smoothly, you need a way to cross-check each cancellation notice against your client records. The simplest way to do this is by using a Google Sheet as a real-time lookup tool.
1. Storing Policy Data in a Google Sheet
Every policy you sell should be logged in a sheet with essential details like:
- First and last name
- AgencyZoom client ID
- Policy number
- Contact details
This makes it easy to match incoming cancellations to existing clients without any manual effort.
2. Searching for Clients Automatically
Zapier can run a search in your Google Sheet whenever a cancellation notice comes in. If it finds a match, great, you can move on to updating records.
But what if the client isn’t found? That’s where things get tricky.
3. Handling Missing Clients
There are a few reasons a client might not be found in the lookup:
- The name format in the carrier’s system doesn’t match how it was entered in your agency’s records.
- The policyholder is listed under their spouse’s name.
- The data never made it into the sheet in the first place.
Instead of letting these fall through the cracks, set up a failsafe:
- If the client is found, proceed with automation.
- If the client isn’t found, trigger a Slack or email notification so someone can investigate.
This keeps cancellations from slipping through unnoticed while ensuring your automation isn’t tripping over bad data.
Once the client is matched, the next step is updating the records in AgencyZoom. That’s where webhooks come in.
Step 4: Webhooks for Updating AgencyZoom
At this point, you’ve filtered out irrelevant notices, handled missing data, and matched each cancellation to the right client. Now it’s time to update AgencyZoom automatically. This is where webhooks come in.
A webhook is like a digital courier. It takes the data from one system (your Google Sheet or Zapier workflow) and delivers it to another (AgencyZoom). Instead of someone manually entering due amounts or updating policy statuses, the webhook handles it instantly.
1. Setting Up the Webhook Connection
AgencyZoom’s API allows you to send updates directly into the platform. To make this work, you need:
- The AgencyZoom API URL
- Your authentication credentials (so Zapier can access your account)
- The specific custom fields you want to update
Once you have this set up, you can send real-time updates whenever a pending cancellation comes through.
2. Updating Custom Fields Automatically
To make sure everything stays organized, your webhook should update:
- Amount Due: If the carrier provides a balance, it needs to go straight into the client’s record.
- Due Date: This ensures your team knows when payment must be made to prevent cancellation.
With these two fields updated, your automation has everything it needs to either notify the client or create a service request.
3. What Happens if Something Goes Wrong?
Webhooks work in real time, but sometimes things break—an expired API key, a formatting issue, or missing data from the carrier. Instead of letting these errors stall your process, add a failsafe:
- If the webhook fails, trigger an internal alert so someone can fix it.
- If a required field (like the client ID) is missing, flag the request for manual review.
With these safeguards in place, your system stays reliable, even when carriers send incomplete or inconsistent data.
Once the webhook updates AgencyZoom, it’s time for the final step—deciding whether to create a service request or alert your team.
Manually tracking pending cancellations is a waste of time and a guaranteed way to let policies slip through the cracks. By setting up an automated workflow with Adapt API, Zapier, and webhooks, your agency can handle cancellations instantly—without human error or endless follow-ups.
This isn’t just about saving time. It’s about creating a system that works in the background, ensuring no client loses coverage due to a missed notice. And the best part? Once it’s set up, it runs on autopilot.
If you’re ready to eliminate manual service tasks and build a more efficient agency, check out Automated Agency. We started this to help independent agencies just like yours streamline operations, reduce busywork, and focus on what actually grows the business.